

A chill is in the air and though Halloween has come and gone, pumpkins are still the gourd of choice for this holiday season. That’s why we here at Fabric and Sewing wanted to make something pumpkin-y to use as home or table decorations for those holiday parties. Not a strong sewer, I thought it best to stick to a project that I could do without a sewing machine – which means this project is both beginner and kid friendly!
Here's what you'll need for this project:

- Fabric - You can buy fabric, use scraps, or even upcycle an old shirt.
- Twine, String, or something similar
- Rubber Bands (2 per pumpkin)
- Stuffing Material
- Adhesive – Fabric glue, hot glue, anything that will hold two ends of the fabric together
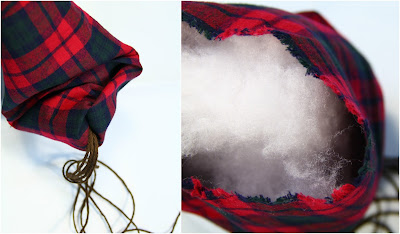
Your fabric can be any size, but for reference we used a 13.5" x 20" piece to make the plaid flannel which is 7" tall, and a 8" x 9" piece to make the orange fleece which is a wee 3.5" tall.

- The first step is to make a tube out of your fabric. If
you’re using an old shirt, just cutting the sleeve will suffice. To do this,
turn the material inside-out and glue (or sew if you want) two parallel sides
together.

- Next cut six pieces (minimum, you may want more if you’re
making a big pumpkin) of your string material so that they’re a bit longer than
your fabric tube. Tie together all the strands with a big knot and thread them
through the tube.

- Gather up the end of the sleeve that’s closest to the knot
and tie it off with a rubber band so that the knot is hanging out.

- Turn the tube right side out and stuff with filling. Stuff it as full as possible, trust me on this. Leave
enough room so that you can tie up the other end and still have a little bit of
fabric left over at the top.
- Gather up the other end of the tube and secure the fabric
and strings with another rubber band. Try to space the stings out evenly around
the fabric when you rubber band them.

- Adjust the strings, tightening them to create sections like
you would find on a pumpkin. You can also tug on the fabric to smooth out your
sections. When you get two strings appropriately taut, tie them together in a
knot around the rubber band. Repeat until your creation is looking
appropriately pumpkinesque.

- Take another piece of string (length varies) and tie it to
the rubber band leaving several inches hanging at the end (if you want a leaf
AND tendrils). Start to wrap the string around and up the excess fabric,
creating a stem. When you’ve reached the top, wind the string back down and tie
a knot at the base of the stem. If you want to add a leaf or tendrils, leave a couple
of inches of string before you cut.


Leaves
Cut a different color fabric in the rough shape of a leaf. Then simply glue the leaf to one of the stings hanging off
the stem and admire your beautiful pumpkin!

Tendrils
If you’re working with a thick, wound sting, you can unravel
the string a bit and either leave them as is or curl the threads. To make a
permanent curl, you can coat the strings in mod podge, wrap them around a
pencil or other cylindrical object, and then pull the pencil out once the modge
podge gets tacky.

